The New Router
I had a previous router that my wife and I bought to experiment with. It was good enough to make a few holes but not really up to scratch for any real work. With a looming shelving project on the way, I stepped up and bought an industry standard Porter Cable 690 family router. What a great thing!
My wife and I like to decorate for Halloween - she has a wonderful collection of crafts and primitives that she makes and we're gearing up to sell online. Not to be left out, each year, I experiment with a new woodworking technique on a decoration for the graveyard we set up outside. Last year, I made a glow in the dark skeleton. This year, I went for a classic gravestone with a routed inscription.
The Template
I had no idea what I was doing so my basic approach was to make a template and then use the router to carve a shape against it. I sketched out a shape and then used a jigsaw and a power drill to cut it out. I tried to ballpark how big the stencil had to be, but having had no experience I just dove in. I would learn the lessons as I went.
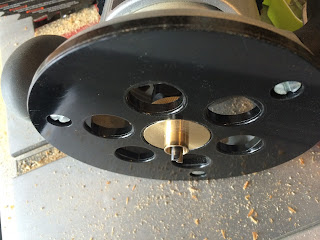
The router and bushing
Here, I have the bushing on the router. A router, for those who don't know, is similar to a drill, except, that it is ideally heavier, so it is stable, and has a flat base with an adjustable height. In this way, you can cut shapes of exact depth into the wood. The Porter Cable 690 series router that I bought is noteworthy because there are a variety of bits and other things that work with it. One such thing is the bushing. A bushing is simply a piece that screws into the base and wraps a bit around the drill end. In this way, you can create a sandwich of a template and the target wood. The bushing keeps the router bit from drilling into the template itself. Obviously, you have to measure correctly.

|  |
The routed piece
A good router leaves the edges smooth. The bottom should be pretty smooth as well. If there's waves or other marks, it means you didn't get a consistent depth. It turns out, that's what the big handles are for. Since I was using an old piece of wood, the routed areas have a very different color. After that, I use a couple of coats of stone texture spray paint, followed by acrylic spray paint to lock it down, to give it that graveyard look. The picture here is after the first coat. Finally, a jig is used to drill some holes in the base for spikes to stick the grave in the ground.

|
 |
Lessons Learned
The biggest lesson I learned in this project is that good template planning is absolutely essential. I just sketched up a skeleton head and an RIP and cut it out of an old piece of wood, which was fine to fool around with. But to make a really good show of it, what I ought to do is consider the bushing size in the design, and plan more elegantly. I can see some computer aided design - even using paint.net with brushes, would be beneficial. That way, I can visualize where the router bit will cut out, inside the bushing area.
Happy Halloween!

No comments:
Post a Comment